A shipping container garden could be the most useful thing you haven’t tried yet. If you don’t have much room in your lawn, the weather is unpredictable, or you want more control over what you grow and how you grow it. The best part is that it doesn’t have to cost a lot of money.
Why a Shipping Container Makes a Great Garden Space?
Before we get into the how, it’s worth understanding the why. Shipping containers were engineered to survive ocean crossings, typhoons, and rough handling, which means they’re already built for the kind of durability that outdoor growing demands.
Beyond toughness, containers offer something traditional greenhouses can’t match: flexibility. You can place them in urban backyards, on gravel pads, or even on rooftops. They can be expanded modularly, add another unit when your growing ambitions outgrow your first box.
And because you’re repurposing an existing steel structure rather than building from new materials, you’re already making a sustainable choice from day one.
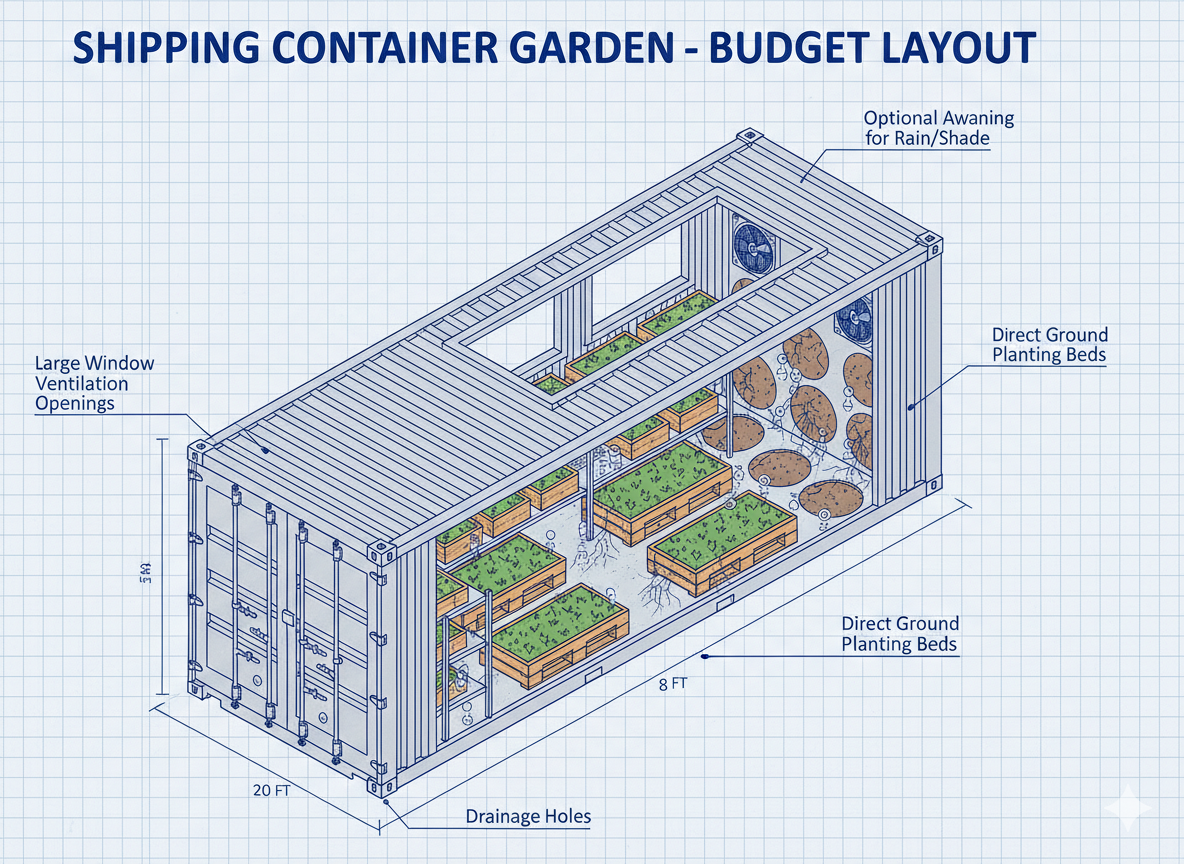
A 20-foot container gives you around 160 square feet of controlled growing space. Stack vertical shelving inside, and that footprint multiplies quickly, making it an ideal solution for anyone who wants to grow more with less space.
Step 1: Plan Before You Build
The biggest budget mistakes happen before a single tool is picked up. A solid plan saves money, time, and the frustration of costly do-overs.
Choose the Right Size
20ft containers are the ideal starting point for most budget-conscious growers. They’re cheaper to buy or rent, easier to modify, and perfectly sized for specialty crops like herbs, leafy greens, and microgreens. If your project grows legs, you can always add a second unit later.
40ft containers make sense if you’re planning a small farming operation or want room for more complex systems like hydroponics or aquaponics from the start. The upfront cost is higher, but the per-square-foot value is better over time.
Budget tip: Don’t overbuild for your first season. Start with a single 20-footer, learn what works for your crops and climate, then scale.
Pick the Right Container Type
You have three options: new, used, or refurbished.
- Used containers are the most affordable and perfectly functional for a garden setup. Look for “cargo-worthy” or “one-trip” containers; these have had limited use and are in solid structural condition.
- Refurbished containers have been inspected and repaired, offering a middle ground between price and condition.
- New containers are the premium option and are rarely necessary for a greenhouse build.
When inspecting a used container, check for surface rust (manageable), structural rust near welds or the floor (avoid), and any signs of chemical contamination. If the container previously carried hazardous materials, walk away.
Find the Right Spot
Plants are particular about sunlight. Aim for a south-facing position that gets as much unobstructed sun as possible throughout the day. Avoid spots shaded by buildings, fences, or large trees, especially in the morning hours when light matters most.
The ground should be level and well-drained. A simple gravel pad or concrete blocks work well as a base and cost far less than a full concrete slab. Also, think ahead: will you be able to run electrical or water lines to this location easily?
Finally, check local zoning regulations before delivery day. Many municipalities are supportive of urban agriculture and modular structures, but rules vary. A quick call to your local planning office can save a significant headache.
Step 2: Make Smart Structural Modifications
This is where your container transforms from a steel box into a growing environment. The goal is to let in light, manage airflow, and create a structure you can actually work inside without blowing your budget on unnecessary upgrades.
Let Natural Light In
Standard containers are dark inside, so you’ll need to open them up. The most cost-effective approach is to cut windows into the sidewalls and install polycarbonate or acrylic panels, both of which are more affordable than glass, lighter, and easier to install without professional help.
For maximum light exposure, prioritize the south-facing wall with either large window panels or, if the budget allows, a full glazed section. An open-top container is another option that dramatically simplifies light access, though it requires a greenhouse-style roof covering to protect plants from direct rain and temperature swings.
If you’re handy with an angle grinder, you can do most of this cutting yourself. Just reinforce all cutouts with steel framing to maintain structural integrity. This isn’t a step to skip.
Insulate Properly
Insulation is non-negotiable for year-round growing, and skimping here will cost you more in heating and cooling bills later. Spray foam insulation is the most effective option it seals gaps completely and won’t attract mold. For tighter budgets, rigid foam boards are a solid alternative when installed carefully with proper edge sealing.
Pay attention to the door frame, floor edges, and any penetrations for electrical or water lines. Temperature swings are one of the biggest stressors for plants, and a well-insulated container holds heat or coolness far more efficiently than a poorly sealed one.
Create a Functional Interior Layout
Think through your workflow before you start bolting things down. Can you move a tray of seedlings from one end to the other without bumping into a shelf? Is there a clear path to your irrigation controls?
Use rot-resistant lumber or galvanized metal for raised beds and shelving. These materials hold up in high-humidity environments without the maintenance headaches of untreated wood. Build vertically where possible: hanging planters, wall-mounted shelving, and tiered racks all increase your growing capacity without using more floor space.
Step 3: Set Up Climate Control on a Budget
Controlling temperature, humidity, and airflow is what separates a productive container garden from an expensive plant-killing box. The good news is that a functional system doesn’t require a huge investment.
Ventilation
Natural cross-ventilation is your cheapest tool. Install intake vents low on one wall and exhaust vents high on the opposite side warm, humid air rises and exits while cooler air is drawn in from below. This setup alone can handle mild climates with minimal supplemental intervention.
For tighter control, add a couple of low-wattage circulation fans and a humidity sensor. Automating a simple exhaust fan with a thermostat or humidity controller costs very little but dramatically reduces the manual monitoring burden.
Heating and Cooling
In cooler climates, electric radiant heaters are affordable to purchase and simple to install. For a more sustainable approach, black water barrels placed inside the container absorb heat during the day and release it slowly at night a zero-cost thermal mass strategy once you have the barrels.
In summer, reflective exterior paint on the container’s roof and walls reduces heat gain significantly before you even switch on a fan or air conditioning unit. Roof vents or a turbine vent are inexpensive additions that make a noticeable difference during peak heat.
Lighting
Natural light is always the priority, but supplemental lighting extends your productive season during short winter days. Full-spectrum LED grow lights have dropped dramatically in price and consume far less electricity than older HID systems.
Mount them on a simple timer to simulate consistent day length for your crops, and make sure any fixtures used in a greenhouse environment are rated for damp locations.
Step 4: Choose Your Growing Method
Your choice of growing system affects both startup cost and long-term yield. Each approach has a different budget profile.
Soil-Based Growing
The simplest and most familiar method. Fill raised beds with a quality potting mix, add organic matter, and you’re growing. It’s the lowest-cost system to set up and requires no specialist knowledge. The downside is that soil-based systems use more water and can introduce pests and diseases if not managed carefully.
Hydroponics
Soilless growing in a nutrient-rich water solution. Hydroponic setups use significantly less water than soil, grow crops faster, and can produce impressive yields per square foot. Basic drip irrigation or deep water culture systems are surprisingly affordable to build yourself. The learning curve is steeper, but the efficiency gains make it worthwhile if you’re growing for the market.
Drip Irrigation (Either Method)
Regardless of whether you go with soil or hydroponic, a drip irrigation system pays for itself quickly. It delivers water precisely to plant roots, reduces mold risk by keeping foliage dry, and dramatically cuts the time you spend hand-watering. Basic kits are inexpensive and easy to install.
Step 5: Pick the Right Crops
Not all plants thrive in container environments, and choosing poorly means wasted time, money, and space. Focus on crops that are well-matched to controlled, compact growing conditions.
High-value, fast-growing crops for beginners:
- Leafy greens (lettuce, spinach, kale): grow quickly, tolerate a range of temperatures, and can be harvested multiple times.
- Herbs (basil, parsley, mint, thyme): in constant demand, grow well vertically, and command strong prices at farmers’ markets.
- Microgreens: ready in as little as 7–10 days, extremely high value per square foot, and ideal for maximizing early ROI
- Cherry tomatoes and peppers: excellent for trellised growing, productive over a long season with adequate light
If you’re growing for personal use, prioritize crops your household actually eats. If you’re growing for sale, research what local restaurants or markets are paying for herbs and microgreens that are consistently strong performers.
Seasonal Planning
A container greenhouse enables year-round production, but your crop mix should shift with the seasons:
- Spring: Start seedlings early, rotate in fast greens, and establish herbs
- Summer: Focus on fruiting crops like tomatoes and peppers; use the container as a buffer against heat extremes
- Autumn: Transition to hardy greens and root vegetables; start seedlings for winter crops
- Winter: Lean on artificial lighting; prioritize leafy greens, microgreens, and cool-tolerant herbs
Rotating crops and practicing companion planting also help maintain soil vitality (if growing in soil) and naturally reduce pest pressure.
Realistic Budget Breakdown
Costs vary depending on your location, container condition, and how much work you do yourself, but here’s a realistic range for a DIY 20ft setup:
| Item | Estimated Cost (USD) |
|---|---|
| Used 20ft shipping container | $1,500 – $3,500 |
| Delivery | $300 – $800 |
| Window/panel modifications | $300 – $800 |
| Insulation (foam boards or spray) | $400 – $900 |
| Ventilation (fans, vents) | $150 – $400 |
| Grow lights (LED, basic setup) | $200 – $600 |
| Irrigation system | $100 – $300 |
| Raised beds and shelving | $200 – $500 |
| Soil/growing medium | $100 – $300 |
| Total estimate | $3,250 – $8,100 |
Doing the modifications yourself, cutting windows, installing insulation, and building shelving, is where the most significant savings are found. If you hire contractors for all of it, expect costs to roughly double.
Note: A 40ft container costs more upfront but offers twice the growing space. For growers selling produce, the ROI timeline is often shorter than the smaller unit.
Common Mistakes to Avoid
Skipping the permit check. Local zoning laws and agricultural codes vary widely. What’s allowed in one area may require a permit or be prohibited in another. Always verify before delivery.
Ignoring drainage. Water needs somewhere to go. Poor drainage leads to root rot, structural damage to the container floor, and ongoing plant health problems. Plan drainage from the start, not as an afterthought.
Choosing the wrong crops. Research what thrives in controlled, compact environments before you plant. Some crops need more space, light, or soil depth than a container realistically provides.
Underestimating light needs. Containers can be surprisingly dark, even with windows. Plan your lighting carefully, and consider the angle of sunlight at different times of year relative to your container’s orientation.
Buying too big, too soon. It’s tempting to go straight to a 40ft container with a full hydroponic setup. But starting small, learning your system, and expanding deliberately is almost always the smarter financial decision.
Creative Low-Cost Additions Worth Considering
Once your growing system is running, a few low-cost additions can significantly improve functionality or sustainability:
- Rainwater collection barrel: connects to your downspout and reduces water costs, especially useful for soil-based gardens.
- Sedum roof covering: if your container has a flat roof visible from above, a layer of shallow-rooted sedum creates a biodiverse green space that also acts as a natural insulator.
- Solar panels: Even a small panel array can offset the cost of running grow lights and fans, particularly useful in off-grid or semi-rural setups.
- Exterior paint: a coat of reflective or light-colored exterior paint on the roof and walls reduces heat gain in summer at minimal cost.
Summary
Building a shipping container garden on a budget is less about compromise and more about smart sequencing, starting with the right size, making targeted modifications, and scaling up only when your growing confidence and market demand justify it.
The steel box that survives a transoceanic voyage is more than capable of handling your tomatoes. All it needs is a little light, a plan, and someone willing to grow something in it.
Frequently Asked Questions
Do I need planning permission to place a shipping container in my garden?
It depends on your local zoning rules and the intended use. In many areas, a container used as an agricultural structure is treated differently from one used as a permanent dwelling. Check with your local planning authority before purchasing; most are willing to advise informally before you commit.
How long does a used shipping container last as a greenhouse?
A structurally sound used container, properly maintained, will last 20–25 years or more. Regular inspection for surface rust (treated promptly with rust-inhibiting paint) and keeping the roof clear of standing water will extend its life significantly.
Can I grow organically in a container greenhouse?
Container growing actually makes organic cultivation easier in some respects; you control the growing medium, eliminate soil-borne contamination risks, and can manage pests in a closed environment without chemical intervention.
What’s the fastest crop to generate income from a container greenhouse?
Microgreens. With harvest cycles as short as 7–10 days and high per-tray value, they offer the quickest return on investment. Many small-scale growers cover their operating costs entirely from microgreen sales while using the rest of the space for longer-cycle crops.
Is a container greenhouse energy-efficient?
With the right insulation and LED lighting, yes. A well-insulated container holds temperature efficiently, and modern full-spectrum LEDs use a fraction of the energy of older growing lights. Adding a small solar setup can make the operation nearly self-sufficient in electricity.